The User interface of EosAutoShooter
The user interface of EosAutoShooter separates into
different areas. The interface is clearly arranged, all
controls are visible all the time:
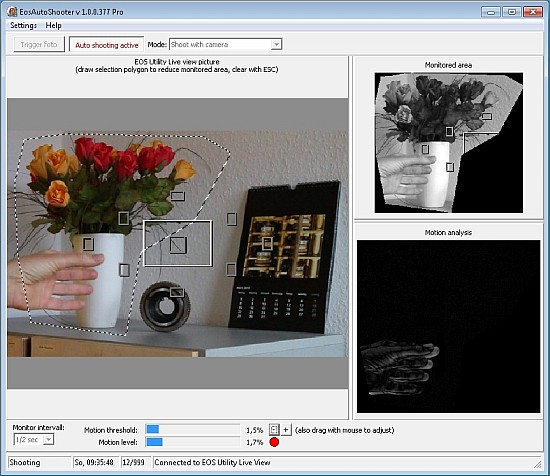
(In this example, I moved my hand before a static background of flower bunch, gear and
calender)
Menu bar
The menu bar on top contains only items for “Settings”, “Help” and “License”.
Upper controls
- WIth the “Trigger photo
” button you can manually trigger an photo or start recording
a movie. Depending on operation mode, it is labeled differently.
You should take at least one manual photo after each start of EosAutoShooter to
verify connection to EOS Utility.
- If the “Activate auto shooting
” button is pushed in, then EosAutoShooter is “armed”.
A photo or movie is taken on every picture change, that is greater than “motion threshold” (see below)
Depending on operation mode, it is labeled with “photo” or “movie”.
- “Mode
” selectes the operation that is performed on motion, if EosAutoShooter is
“armed”.
Activate automatic shooting only after you have setup the camera. Else nearly every
change in zoom factor, focus, or alignment will change the Live View picture and
trigger photos.
Deactive automatic shooting, if you must change any settings on your camera, in EOS
Utility or EosAutoShooter.
Preview images
EosAutoShooter displays permanently three different preview pictures, so you can check the
motion detection process in detail.
- “Eos Utility Live view picture
” displays the viewfinder picture, as it is acquired from
EOS Utility or another program.
A selected area is surround with dashed lines. (The other rectangular areas in the
picture are auto focus points and shown by EOS Utility)
- “Monitored Area
” displays the picture as it is seen by the motion detection algorithm:
it is only black-and-white, clipped to the selected area and brightness is stabilized.
- “Motion analysis
” displays the result of motion detection algorithm. Those parts of
the picture which have changes against the last sample point are shown in bright pixels.
Unchnaged picture areas are displayed in black. So the amount of “brightness” in this
picture is an indicator of how much motionis detected.
(In the sample above you see the outline of my moving hand, the static objects
(flowerbunch,. etc) are not visible)
Those three preview pictures are separate by two “splitter” controls. You can grasp them
with the mouse and move them, this resizes the pictures on both size of the splitter.
Limit motion detection to a selected area
Motion detection can be restricted to a part of the Live View picture by marking a part of the
picture with a polygone:
To start click once into “Eos Utility Live view picture”
. Each following point of the
polygon is set by another mouse click. Close the polygone with a double-click. Another
polygone can be added by starting with a Shift-Click..
A drawn polygone can not be edited, but moved with mouse.
All polygones will be deledet by pressing the “ESC” key.
Polygones will be saved and restored on the next start of EosAutoShooter.
Lower controls
- “Monitor intervall
” specifies how often pictures are checked for motion.
- “Motion threshold
” specifies how much motion is needed to trgiier a photo or a
movie. The blue bar can be adjusted with the mouse in range of 0% to 10% “change”.
For very fine adjustment use the “+” and the “-” buttons.
- “Motion level
” displys the actual amount of “change” as claculated by the motion
detection algorithm.
- “Trigger indicator
” is a little lamp-like control to the right of “motion level”. It has
three possible states indicated by color:
1. “grey” means: “Motion level” is less than “Motion threshold”, only a small amount of
motion was detected.
2. “yellow” means:: “Motion level” is greater than “Motion threshold”. No photo is
triggered, because auto shooting is not activated, or EosAutoShooter is in a state of
operation in which it can not trigger a photo. This is the case if a shooting sequence
with long pauses is already running..
3. “red” means: photo or movie is been trgiggered..
ATTENTION: A wrong motion threshold may cause a high amount of automatically
triggered photos, this may decrease the life time of your camera!
Status line
On the bottom a status line with four info fields is displayed:
- Status
displays EosAutoShooter’s state of operation (In the example above it is
“Shooting”). The sate of operation changes automatically depending on user actions or
motion detection:
|
State
|
Info
|
|
Setup
|
EosAutoShooter is not working, because some
settings are being changed.
|
|
Connecting
|
EosAutoShooter tries to connect to EOS Utility.
|
|
Stabilizing
|
After connection to EOS Utility
EosAutoShooter evaluates the Live View
pictures until no more motion is detected. No
photos are triggered during this initial
period.
|
|
Ready
|
The Live View picture is monitored for
motion, but auto shooting is deactivated. You
can still trigger photos manually.
|
|
Monitoring
|
The Live View picture is monitored for
motion, and auto shooting is active. So on
motion photos or movies are triggered.
|
|
Before Shooting
|
A photo is beeing triggered. EosAutoShooter
delays the actual photo, because you setup a
pause before pressing the trigger button.
|
|
Shooting
|
The trigger botton is pressed, a photo or movie is taken.
|
|
After Shooting
|
EosAutoShooter has triggered a photo and is
ignoring further motion now, because you
setup a waiting period under “settings”
|
|
Manual Video
|
In mode “Movie” the “Trigger movie”
button has been pressed.
|
|
Auto Video
|
In “Movie” mode recording has been started by motion.
|
|
After Video
|
EosAutoShooter is waiting for some time
after recording a movie. Further motion is
ignored.
|
|
- Motion timestamp. (In the example: “So, 09:35:48”).
This is the time of the last detected motion.
- Trigger counter (in the example:”12/999”)
This field displays the amount of photos wich have been trgiggered automatically since
EosAutoShooter was set to “auto shooting”.
The other number is the maximum number of camera shoots per run.
- Info
(in the example: “Connected to EOS Utility Live View”)
Some more informations and error messages.
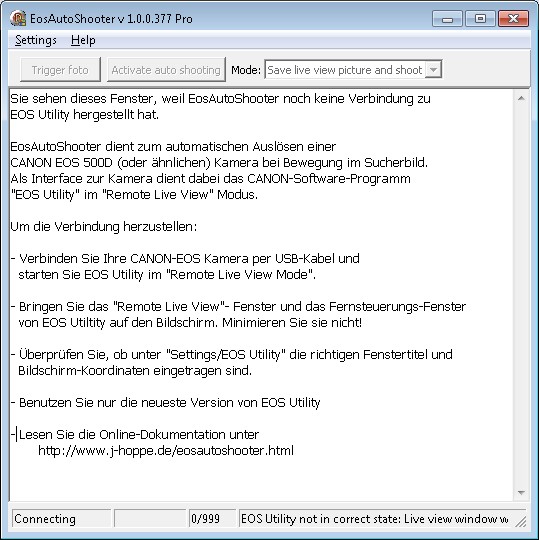
No contact to EOS Utility
EosAutoShooter needs contact to EOS Utility. If EOS Utility is not started, or not in Remote
Live View mode, or Live View picture or trigger button can not be found, then
EosAutoShooter displays a help screen instead of the normal user interface:
|

